Length and Time
Length
Length is defined as the measurement of an objects or something from one end to the other. SI unit is metre. The symbol of unit is m.
The following are the Instruments for measuring length
(i) Meter rule
(ii) Measuring tape
(iii) Vernier caliper
(iv) Micrometer screw gauge
(v) Engineer’s caliper
Ruler and Measuring tape
How to use the ruler or the measuring tape
(1) Put the 0 mark on the end of the object.
(2) Read the mark at the other end of the object.
Caution: The eye must be placed vertically above the mark on the scale.
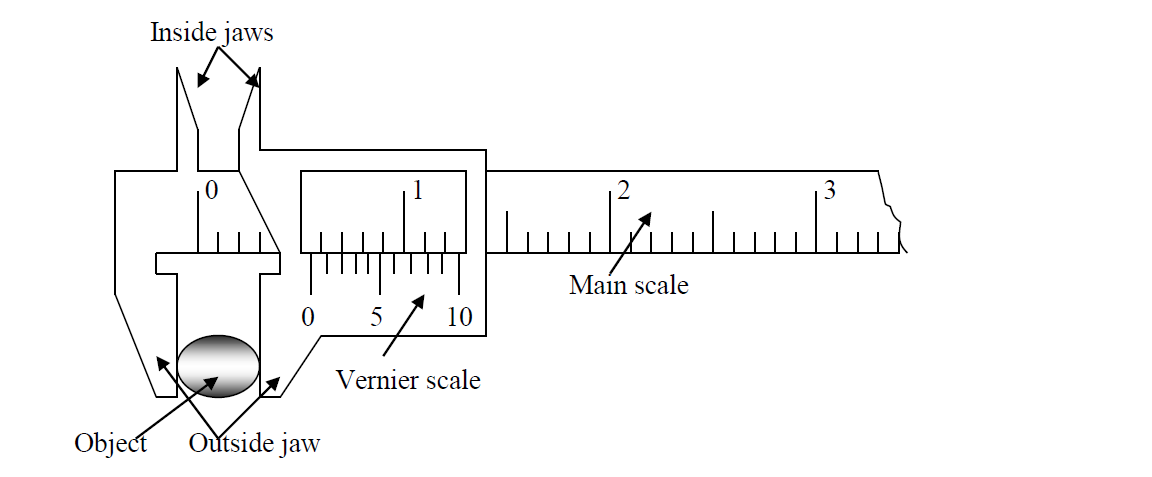
Vernier calipers
The vernier caliper is an instrument used to measure the internal and external diameter of cylindrical object such as a water pipe. The vernier caliper is more accurate than a meter rule and it is used to measure small dimensions of length.
The vernier caliper has two linear scales i.e. fixed ( main ) scale and moving ( vernier ) scale which has 10 subdivisions.

How to use the vernier calipers
(1) Put an object to be measured between jaws.
(2) Read the main scale before the 0 mark of vernier scale.
(3) Look at the vernier scale and find a marking on the vernier scale that is in line with the main scale. Commonly, the reading on the vernier scale is for the 2nd place of decimal in centimetre.
(4) Add the main scale reading and the vernier scale reading.
Micrometer screw gauge
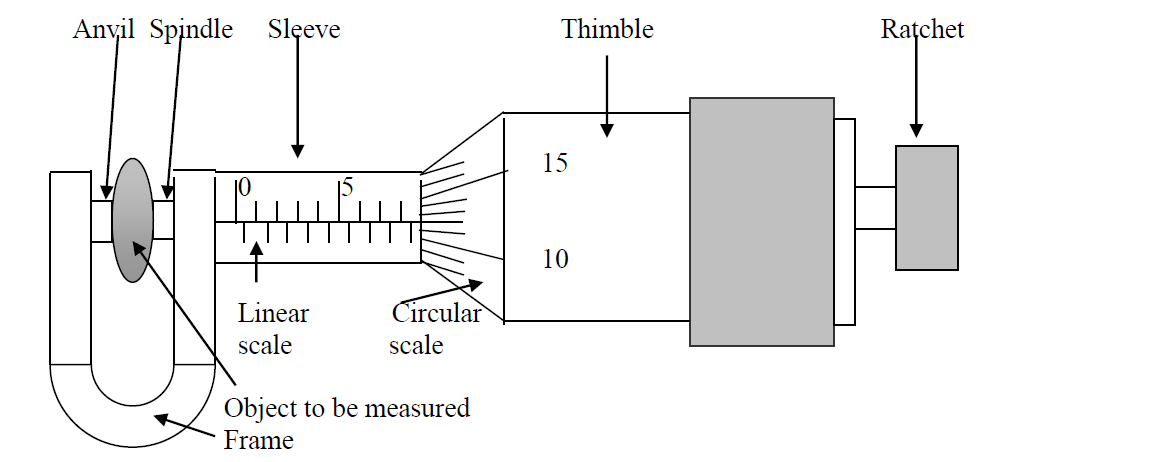
The micrometer screw gauge is a very sensitive instrument for measuring very small dimensions of length such as the thickness of a metal wire, hair or paper. The micrometer screw gauge is more accurate than the vernier caliper.
The linear scale is graduated in half mm graduations and the circular scale represents 0.01mm of the movement of the spindle. The spindle is driven forward and backwards by the screw which is inside the thimble.

The main parts of a micrometer screw gauge are anvil and spindle where you clamp the object to be measured, the sleeve where there is the linear or fixed scale, the thimble where there is the circular or rotating scale and the ratchet.
The reading for the micrometer screw gauge shown above is
Reading from the linear scale = 8.50mm
Reading from the circular scale = + 0.12mm
Final reading = 8.62mm
Precaution Taken When Using a Micrometer Screw Gauge
(i) Wipe dust from the anvil and spindle
(ii) Wipe the object to be measured
(iii) Use the ratchet for tightening the instrument as you clamp the object until you hear a click sound to avoid over tightening of the screw which may cause damage to the screw or deformation of the object.
(iv) Make correction for the zero error if it exists as a result of the zero mark on the circular scale not being able to coincide with the middle line of the fixed scale when the instrument is in the closed position.
The accuracy of a micrometer screw gauge is 0.01mm.
Engineer's Caliper
The engineer’s caliper is used to measure the internal and external diameters of hollow objects such as pipes. The object to be measured is clapped in the jaws of the calipers. The instrument has no scale attached to it. The calipers are locked in position once they have been used to mark the dimension and the measurements are red off by laying the caliper points onto a scale ruler.

Time
The SI Unit for time is seconds and the symbol is (s), other units are minute, hour, day, month, year, century
Instrument for measuring the time
(i) Clock
(ii) Watch
(iii) Stopwatch
(iv) Pendulum
Simple pendulum
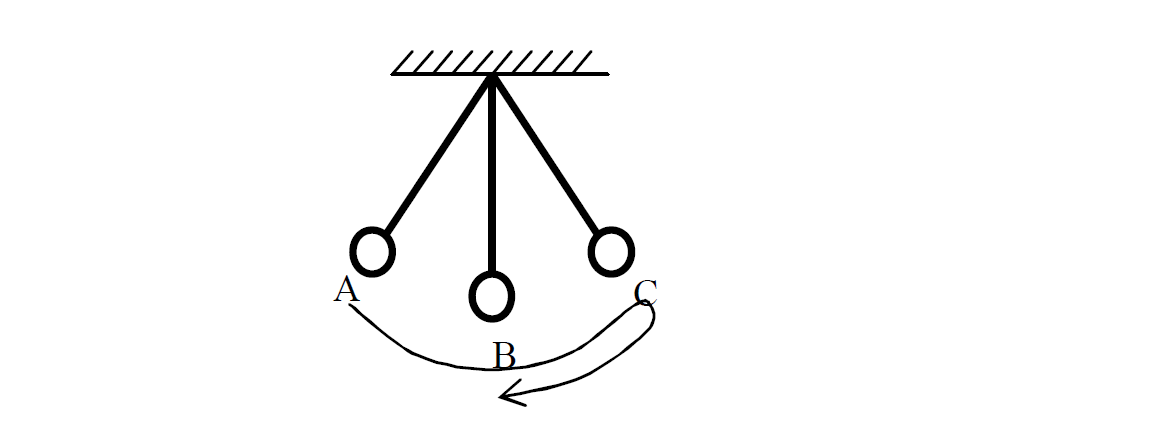
The diagram below shows a simple pendulum with length l.
The length l should be from the ceiling to the centre of the bob
Period (T) is defined as the time taken for one complete oscillation. (time taken from A to C and back again to A.)

Formula for Period
T: Period [s]
n: number of oscillation
t: time taken for n oscillation [s]
Example of a pendulum
The diagram shows a pendulum oscillating between position A and C. It takes 3s to go from A to C and back to B. What is its period?

Solution
Given that
t = 3s
n = 3/4
T = ?
Answer :